Introduction to the Advanced Funding Source Template
Organization administrators or project teams are responsible for setting up and managing funding source templates in CareVision, including upgrading to advanced funding sources in preparation for Support at Home. The templates allow organizations to standardize funding management by specifying details like allocation categories, funding periods, default inclusions, and advanced budgeting options, ensuring consistency across client profiles and quotes.
This topic describes the process for upgrading your funding sources, including configuring fee items, billing categories, and linking them within the funding source templates to support quoting and reporting.

I. Prerequisites

2. Click General Config.

3. Find the Organisational Structure section and click +Create.

4. Set the Type field to Department.

5. Set the Name field to SAH.

6. Specify a Department Head. This person will receive escalation notifications. Decide where these notifications should be directed in the system.

7. You can bulk select clients and staff to include in the department you are creating.

8. Click Save.


Regions allow you to assign a home region to clients and multiple regions to staff. While not affected by Support at Home changes, regions can help with matching staff or contractors to clients and controlling permissions. For example, you can limit coordinators’ access to staff and clients within their region.

2. Click General Config.

3. Find the Organisational Structure section and click +Create.

4. Set the Type field to Region.

5. Set the Name field to a specific region.

6. Add clients or staff to the region you created.

7. Click Save.

1. In the left-side navigation pane, click Settings.

2. Click Allocation Category.

3. Click +Create Allocation Category.

4. Set the Name field to the name of the allocation category.

5. For Care Management, turn on the Is Pooled Funding toggle to indicate that this allocation is shared across all clients.

6. Turn on the Active toggle to indicate that the allocation category is currently active.

7. Click Save.

8. Repeat these steps for other allocation categories such as Clinical, Independence Support, Everyday Living, and any other relevant allocation categories.

Billing categories are used to organize and identify different types of charges or funding, such as subsidies and supplements, that can be billed to a client. They help ensure each type of funding or service is tracked and billed correctly. Ensure each billing category reflects the correct fee structure (daily, once-off, etc.).

2. Click Billing Categories.

3. You can select an active billing category from the list and click Edit. Alternatively, click + Create Billing Category to create a new one.
- We recommend always updating rates based on your existing rates. If you edit existing rates, all your existing codes will be copied over, making the process more efficient. For more information, see Guide to updating Billing Categories
- If you create a new draft from scratch, you will need to add all codes manually, which can be more time-consuming. For more information, see Understanding the different types of Billing Categories.

4. Set the Name field to the name of the billing category, for example, Care Management.

5. Set the Time field to Time Category.

6. Click Draft Rate Sets.

7. Click Create draft.

8. In the Effective From field, enter the date when the new billing category will take effect

9. Set the Allocation Category field to Care Management.

10. Set the Unit field to Hours.

11. Specify the rates for Default Rate, Public Holiday, Saturday, Sunday, Weekday Day, Weekday Evening, and Weekday Night. Then, enter values for the Amount and Minimum Quantity fields for each category.
12 .Click Save after updating each time bracket.

13. Click Publish to apply the changes.

14.Scroll down and click Save again to finalize.

2. Click Funding Items.

3. You can create a new fee item to align with Support at Home. For example, Support at Home - HCP Transitional - Level 1.

4. Specify the Name field. This is the label you assign to the fee item, such as Support at Home - HCP Transitional - Level 1, to make it easily identifiable..
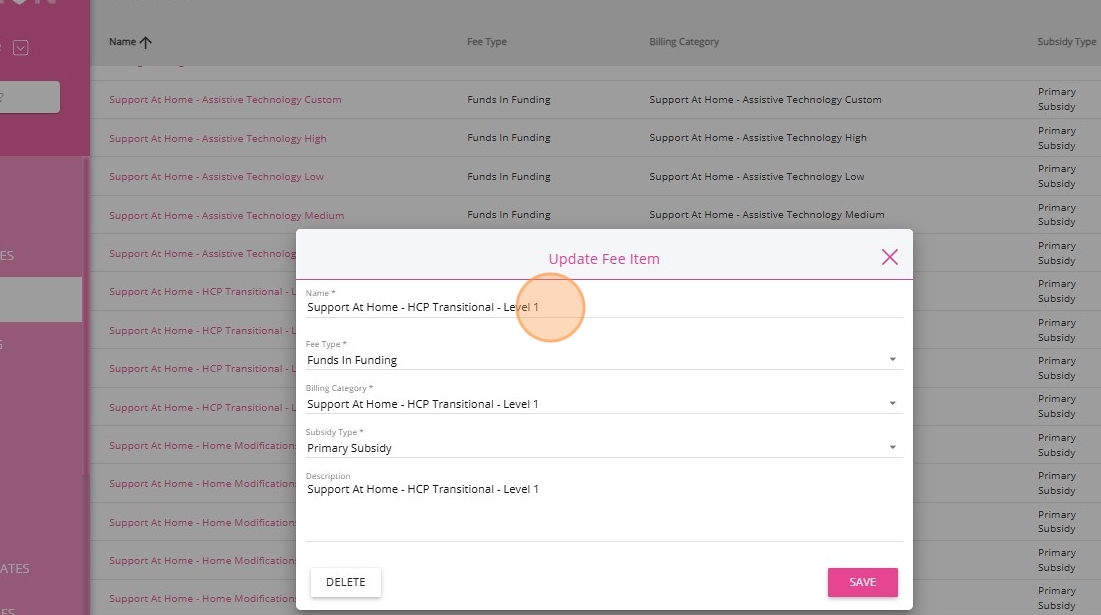
5. Set the Fee Type field to Funds in Funding. This ensures the fee item is treated as a source of funding that adds value to the client’s budget, rather than as a charge or deduction. This also reflects subsidies or supplements that increase available funds, which is important for correct budget calculations.
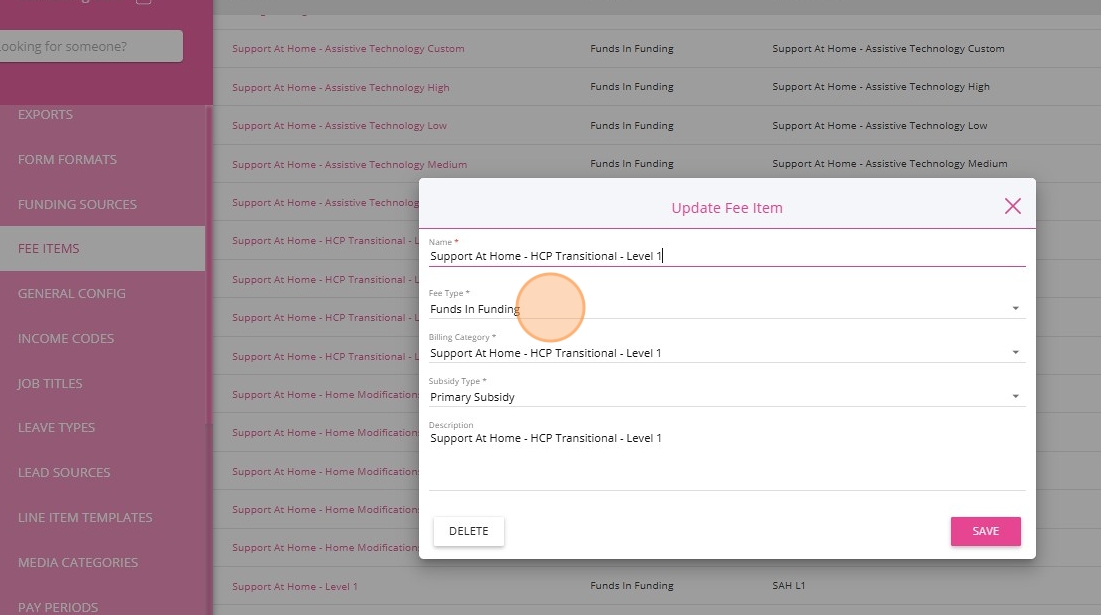
6. Specify the Billing Category field. This links the fee item to a specific billing category, for example, Support at Home - HCP Transitional - Level 1, ensuring it is associated with the correct funding stream.
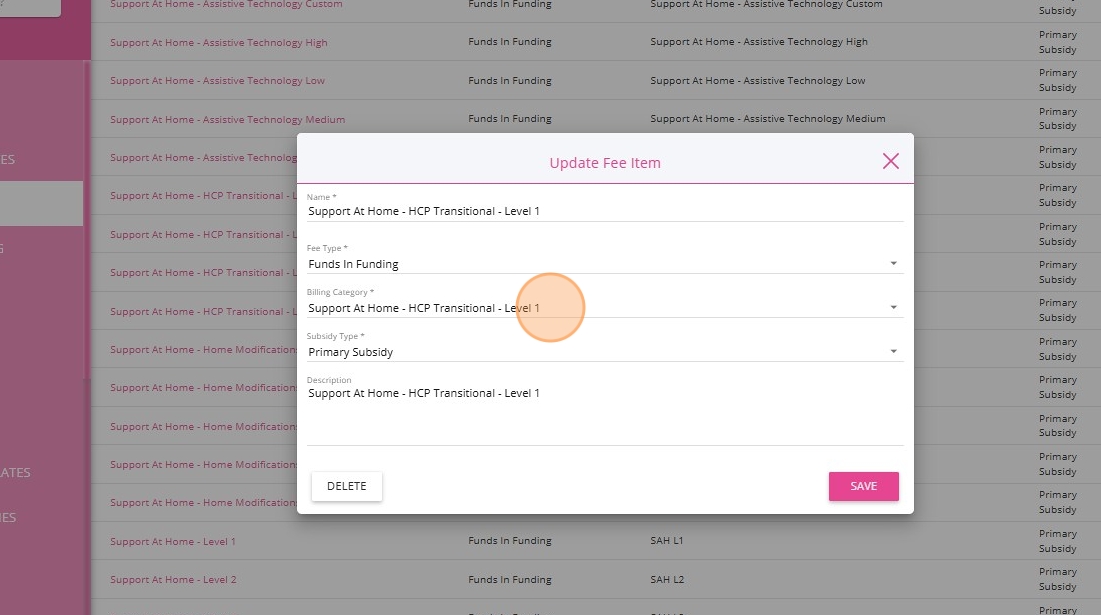
7. Specify the Description field. Provide additional details or context about the fee item to clarify its purpose and how it should be used.

8. Click Save.

When designing services for Support at Home, we generally follow the Support at Home structure but assess whether a service should be split or combined. For example, Nursing may need to be split into roles like Registered Nurse and Enrolled Nurse to reflect different skills and certifications. Staff may require specific certifications or different forms for each service type. Aligning services with required skills and certifications ensures only qualified staff are booked.


- Typical Tasks: Enter a task related to the service.
- Skills: Specify the required skills for staff to deliver the service. The skill name must match an entry on your Skills list.
- Service Type: Choose the service type, such as Bookable, Offer, or Supervision. Bookable is selected by default.
- Form Format: Select the appropriate format, such as Shift Note. The form name must match an entry on your Forms list.
- Instructions to Staff: Provide any specific instructions for staff if you want to include default guidance to improve standardization of service quality.

- Specify the Billing Category.
- Set the Effective From date to determine when this category becomes active.
- Use the Active by default? checkbox to indicate if this category should be automatically enabled.
- Specify the Billing Category.
- Set the Effective From date to control when the category is applied.
- Use the Active by default? checkbox to enable the category automatically if needed.

- Click the Visit Duration line item.

- Click Add Line Item to display fields where you can set how the client will be charged and how the staff will be paid.

- Specify the Bill Using and Pay Using fields:
- Scheduled Time: Bill based on the scheduled appointment time.
- Check-in/Checkout Time: Bill based on the actual check-in and check-out times.
- Custom Time: Enter a custom duration for billing.
- Reported by Staff: Bill according to the time reported by staff.

- Specify the Claim Type field.

- Click Distance Travelled with Client.

- Click Add Line Item to display fields where you can set how the client will be charged and how the staff will be paid.

- Specify the Bill Using and Pay Using fields:
- System Tracked Distance: The distance is automatically calculated by the system from the staff member’s device during the service.
- Staff Reported/Adjusted Distance: The staff member manually enters or adjusts the distance travelled with the client, allowing for corrections or additional details not captured by the system.
- Custom Distance: A specific distance value is entered manually to accommodate unique scenarios.
- System Tracked Time: The time spent travelling is automatically recorded by the system using check-in and check-out data.
- Staff Reported/Adjusted Time: The staff member manually enters or adjusts the time spent travelling, allowing for corrections or special cases.
- Custom Distance: Both the distance (in kilometres) and the duration of travel are entered manually, providing full flexibility for unique billing and pay situations.

- Click Callout Distance.

- Click Add Line Item to display fields where you can set how the client will be charged and how the staff will be paid.

- Planned: Uses the planned or scheduled route distance.
- Check-in: Uses the actual distance based on staff check-in location.
- Custom: Allows you to manually enter a specific distance in kilometers and minutes.

- Previous checkout location to scheduled start location: Calculates distance from the last checkout point to the next scheduled start location.
- Previous appointment’s scheduled end to check-in location: Uses the distance from the previous appointment’s end location to the current check-in location.
- Previous appointment’s scheduled end to scheduled start location: Calculates distance from the previous appointment’s end to the next scheduled start.
- Custom Distance: Manually enter a specific travel distance.
- Custom Minutes: Manually enter the travel time in minutes.

- Click Sleepover.

- Click Add Line Item to display fields where you can set how the client will be charged and how the staff will be paid.

- Scheduled Time: Bills based on the scheduled sleepover period.
- Actual: Bills based on the actual time recorded during the sleepover.
- Manual: Allows you to manually enter both the start time and duration.


2. Click Line Item Templates.

3. Click + Create Template.

4. Specify the Template Name field.

5. Specify an allocation category for the template.

6. Specify the Description field. This gives brief details about the line item template and its purpose..

7. In the Expected Quantity field, enter the number of units or items anticipated for this line item.

8. In the Expected Rate field, enter the cost for each unit or item.
9. In the Expected Unit field, specify the measurement used for billing or claiming purposes, such as “voucher” or “unit of transport.”

10. Specify the Expected Tax field. Select the appropriate tax treatment for the manual line item (GST free, GST inclusive, or GST exclusive).

11. The Estimated Subtotal field will auto-populate after you complete the above fields, showing the calculated total for the line item.
12. Click Save.

II. The Advanced Funding Source Template
A. Navigate to the Funding Source Advanced Mode

2. Click Funding Sources.

3. Click Create New Template.

4. Turn on the Advanced Mode toggle.

5. Set the Template Name field to the name of the funding source, for example, Support At Home - Level 1.

6. Specify the Budget or Funding Type field, which is used to categorize and group funding sources. In most cases, this field is the same as the template name for the funding source, unless your organization uses specific naming conventions.

7. Specify the Budget or Funding Type Reference field. This field is typically set to values like Support at Home and allows you to assign all related funding sources to a common reference.

8. Specify the Funding Level field. Enter the funding tier, such as 1 for Level 1, to indicate which level of support or budget applies to this template.

9. Specify the Departments field. This ensures that only clients assigned to the SAH department can access or be allocated this particular funding source. If your organization has multiple departments (such as HCP, CHSP, or SAH), specifying this field ensures that the business rules configured in your system settings are applied.

10. Specify the Regions field (Optional). Only clients or operations within the selected region(s) can access or be assigned this funding source.

11. Specify the Funding Source Reference / Referral Code field. Organizations may use this field to enter codes such as service provider IDs, government-issued funding references, or custom referral codes required for reporting or billing. If there is no provider ID the provider can add the funding source name to this field.

12. Specify the Outlet Activity ID field. It serves as a unique code that links an activity to a particular outlet, branch, or service location. This is used for filtering the export for invoicing and claiming.

13. Specify the Management Type field. This field categorizes the funding source according to its management structure, such as "Support at Home,"

B. Funding Fee Items

2. Specify the Options for Billing when Funding Expires field.

Options for billing when funding expires:

4. Select a funding fee item.

- The available options will be based on your initial setup, such as your primary subsidy or supplements like "Support At Home - Level 1" or "Oxygen Supplement."

5. The subsidy type will auto-populate to determine whether the funding fee item is a primary subsidy or a supplement.


7. The Rate refers to the monetary value assigned to a funding fee item.


C. Funding Service Program Allocations

2. Under the Item column, select an allocation category such as Care Management, Clinical, Independence Support, Everyday Living, Assistive Technology, Home Modifications, CHSP Client Contribution, CHSP Government Contribution, Restorative Care, or End of Life. Options will appear based on the allocation category setup you previously configured.

3. For each allocation category, enter the percentage of the total funding that should be allocated. Example: Set 10% for Care Management, and distribute the remaining percentages across other categories based on your organization’s requirements.


6. Review all allocation categories, percentages, and settings to ensure they match your organization’s funding rules and requirements.

D. Fee Items, Services, Billing Categories, and Line Item Templates

2. You can also add restrictions around services. Select the services that are permitted to be funded by the template.

- Only the selected services will be available when this funding source is assigned to a client.

3. In the Billing Categories field, select which rates are applicable for the selected services under this funding source. This ensures that only approved rates are used for billing and claiming against this funding source.

4. Manage restrictions on line item templates to ensure that each type of expense is allocated to the correct funding category and to prevent accidental misallocation by your team. For example, you may want to allow only consumables to be charged against core funding, while restricting assistive technology components to their appropriate funding categories.
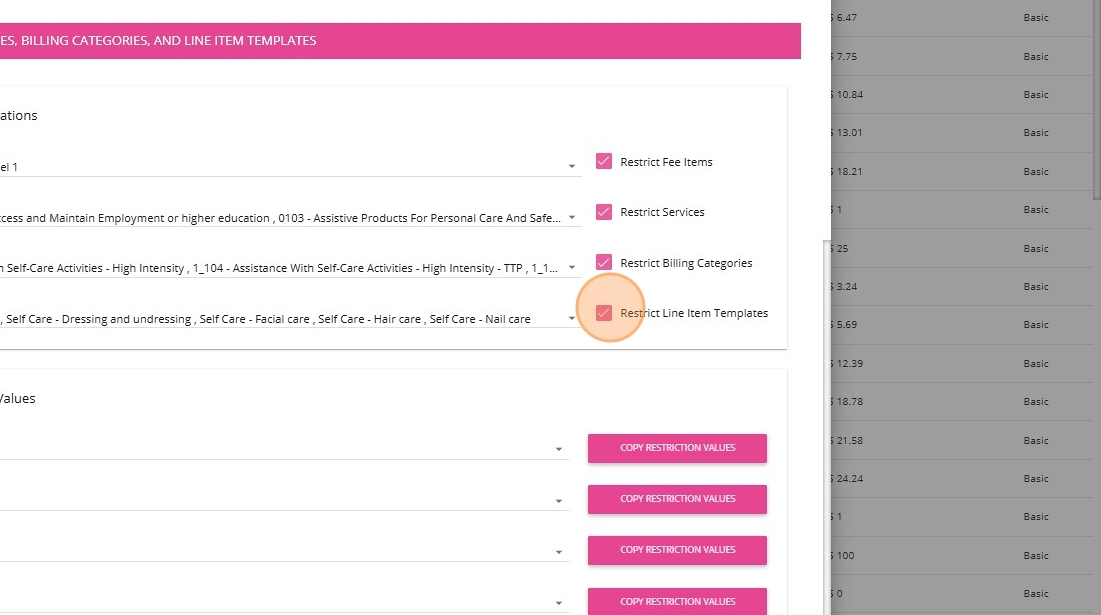

6. Manage the References section. References may include income codes, cost codes, and reporting codes that you use for tracking and reporting purposes. If you have any questions about how to use these references, contact the CareVision Team.


III. Add Funding Source Template to Client Quotes

2. In the Funding Template section, add the funding source template. It will automatically fill in the relevant details, such as applicable fee items, restrictions, allocation categories, and related rules, directly from the template. This ensures consistency and reduces manual errors in your quotes, as the template enforces the setup and rules defined by your organization.

This topic explained the process of configuring the advanced funding source template in CareVision, including key steps for setting up prerequisites and linking fee items, billing categories, and allocation rules to support quoting workflows. For more information about funding source templates or assistance with setup, contact the CareVision Support Team.
Related Articles
Configuring Funding Source Templates
What are Funding Sources Funding Source Templates define the standard parameters for client funding arrangements making it easy to assign and set up clients and quotes. When assigned to clients various additional details are captured that are client ...Advanced Booking Details Feature
I. Advanced Toggle Added to Line Items The Advanced toggle is a setting in the Line Items section of a booking that, when turned on, activates the Advanced Booking Details feature. This feature allows you to view and manage detailed information for ...Funding Source and Department Linking
What is Funding Source Filtering by Department This feature was introduced in order to filter the list of available Funding Sources based on which Departments a client is currently assigned to. For most care providers this functionality is not ...Support At Home - Template Config Workbook - Updated 2025-10-13
See attachment below for the Config Workbook as an Excel file, as there have been some reports of technical issues with downloading. The Config Workbook is an Excel document we use during implementations to plan and stage your organization’s specific ...Funding Rules Explained
Background Funding Sources in CareVision and for each Client CareVision allows your organisation to setup preconfigured templates containing fees, services and billing categories that relate to a particular funding type. Configuring Funding Source ...