Setting up Funding, Fees and Services from the Client's Profile
When exisiting clients of organisations have been imported into CareVision, the process of Quoting and Contracting ias unnecessary as they are added as Active Clients.
Organisations can set-up their clients by simply creating a client, add funding, fees (if needed) and services straight to the client's profile.
In this Knowledge Base, we will discuss how you can populate a client's profile and make them roster-ready without building a quote.
This process involves:
1. Checking Funding . Make sure that services and rates are aligned with the funding.
2. Check fees and charges
3. Review the client's care plan, check that the schedules are aligned on calendar or scheduling.
4. Check that preferred staff are added.
Adding Client's Funding Sources and Income
Funding Sources can be added using the organisations Funding Source Templates or adding in a custom funding source for the client.
The funding source contain the rules and details of the funding and subsidy that the client has.
Steps to add Funding Sources for Clients:
- On the Client's Profile, expand the Funding Sources section
- Click on CREATE NEW FUNDING ITEM
- Fill out the Create New Funding Source form
- Funding Source Templates - The source of income to the clients services. There are default funding source templates set up to make it easy for you to set up a new client. The templates contain the reporting details, values, and renewal period. If you select from a funding source, the fields will autopopulate with the default values set on the templates.
- Budget or Funding Type - Funding Source Name. If you are not adding a funding source from a template, this is required.
- Funding Type Reference - The type of funding, this allows multiple funding sources of the same type to be pooled
- Level - This is optional and very particular to the Home Care Package where there are different levels to subsidies.
- Outlet Activity ID - Label used for exporting and reporting.
- Amount - Amount of funding income in the period
- Renewal Period - The frequency of the funding amount renewal. You may indicate if the fund renews on a daily, weekly, monthly, yearly or poly-weekly basis.
- Start Date - The start date of the client funding
- End Date - The anticipated end date of funding, however this can be left open ended / blank if it is ongoing funding.
- Outlet Activity ID - The Outlet ID of the funding source is a reference used for DEX reporting, however it is also used to group funding types similar to funding type reference above in the exports.
- Fees - These are the fees which are applicable to the selected funding source or funding source type and could be charge to the client
- Services - The group of services or billing categories which this funding entitles a client to receive.
- Service Billing Categories - These are the available billing category rate sets associated with the services selected, and which are applicable to the type of funding
- Participation Type - The Type of Participant, used for Government Reporting
- Reason for Assistance/Funding - Used for Government Reporting, uses DEX standard.
- Once you are done adding the details, click SAVE.
Adding Fees on the Client's Profile
Clients need to pay various kinds of fees, sometime topping up a fee to pay for a service (funds in - add), sometimes paying the required amount to receive a funding (funds in - deduct), sometimes simply paying additional fees from the funds (funds out).
Steps to add Fee Items for Clients:
1. Click the
People
on the side bar menu.
2. Select a client profile from Clients menu or using the search box on top of the side bar menu.
3. Click the FEES accordion to expand this section.
4. Click the Create New Fee button.
5. A modal will be displayed to input the Fee Item for the client.
6. Select an option from the dropdown to use the Fee Item template, created on Settings > Fee Items . Otherwise select None.
7. If a template was selected, the fields will be auto-prefilled. Some fields are disabled to prevent the user from updating the value. The disabled fields are: Unit, Renewal Period and Billing Category . If the Fee Item template was left to None , manually input the fields. In the Fee Type field, it is important to choose the correct type from Funds in - Deduct, Funds in - Add, and Funds out.
8. Set the Start date and End date of the client's Fee Item by selecting a date from the calendar. Start Date is required.
9. Funding can be linked to the Fees by selecting an option from the dropdown list. This list does not display any specific funding source (For example, HCP Level 2), as Fees are linked to the funding source types. This will display all the available funding source types (HCP, CHSP, NDIS, Private, etc) of the funding sources that have been added to the client's profile.
10. Click the Create  button to save the client's Fee Item. To cancel click the Close
  button.

Creating a Care Plan
The Care Plan is an essential part of the client profile since it determines how services are delivered on a regular basis to satisfy the client's needs. It defines what kind of support your client should get, how it should be delivered, and who should deliver it, based on your client's assessed unique individual needs. Care plans are developed in response to individual needs, and hence range from one person to the next. Despite the fact that each care plan is unique, they all serve the same goals, which include:
- Assuring that the treatment your client should receive is documented.
- Making sure that your client will receive the same level of care regardless of who is on duty.
- Assisting you in identifying and managing your client's care requirements.
Steps on how to create a Client's Care Plan
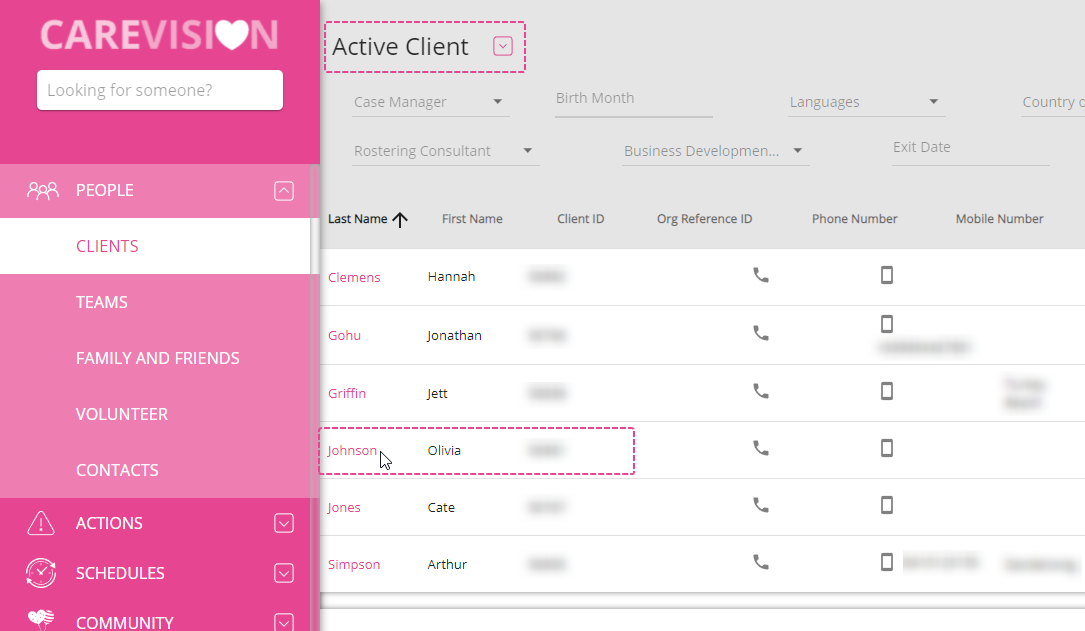
Select People from the Portal's menu tab. After that, go to Clients .
Choose a Client to make a Care Plan for by clicking their name on the Active Clients page. We used Olivia Johnson as an example here.
Go to Care Plans once you're on the Client's complete profile. You will be able to click on Create New Care Plan after the section has been expanded.
Fill out the Create Care Plan form's upper section.
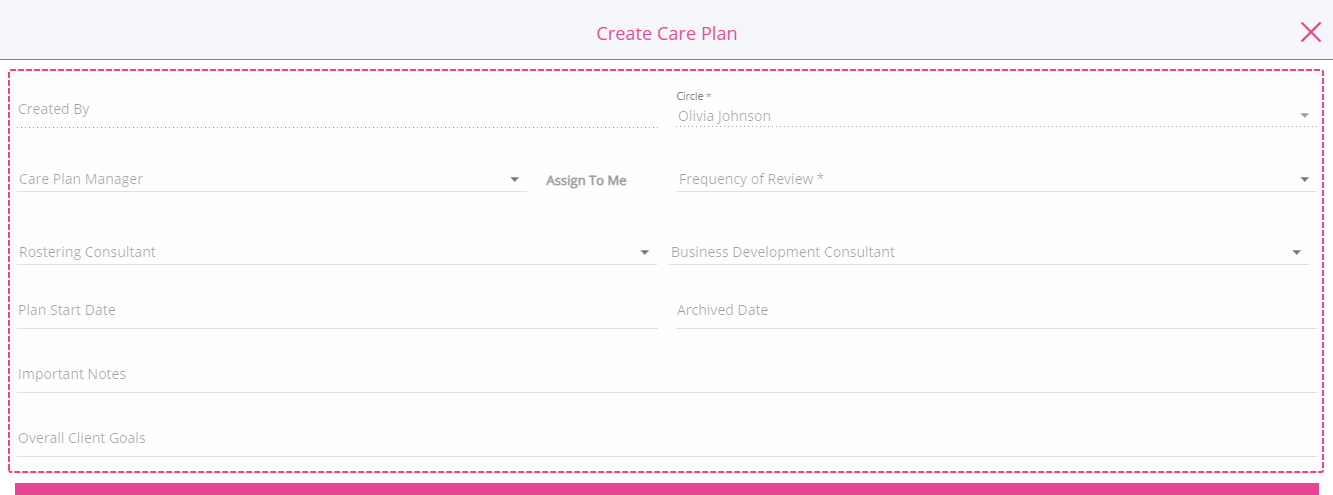
Nominated Care Plan Manager: Choose a case manager from the dropdown.
Frequency of Review: Care requirements can change overtime. To ensure that your services are fulfilling the needs of the care recipient, you must review care plans at least once every 12 months. At any time, a client can request a review of their care plan. Keep their budget in mind when discussing adjustments. To best meet their care needs, you should maximize use of their budget.
Start Date: When is the client most likely to sign up and begin?
Overall Goal: Encourage the client to assess their long-term goals. This will assist them in determining which services will best meet their requirements. A goal can be to live a healthier life or to become more self-sufficient.
Important Notes: This is an general reminder/note for staff and contractors that applies to EVERY service delivered under the Care Plan. Consider including here things like safety warning about access to the home, something important that every worker needs to be aware of. Also be aware that it is included in all services.

Do not add in an Archived Date yet, as this will archive the care plan and make it inactive on the selected date.
Adding Services to a Care plan
Expand the Care Plan Services, and click on ADD NEW ITEM TO PLAN.
Care Plan Item Details
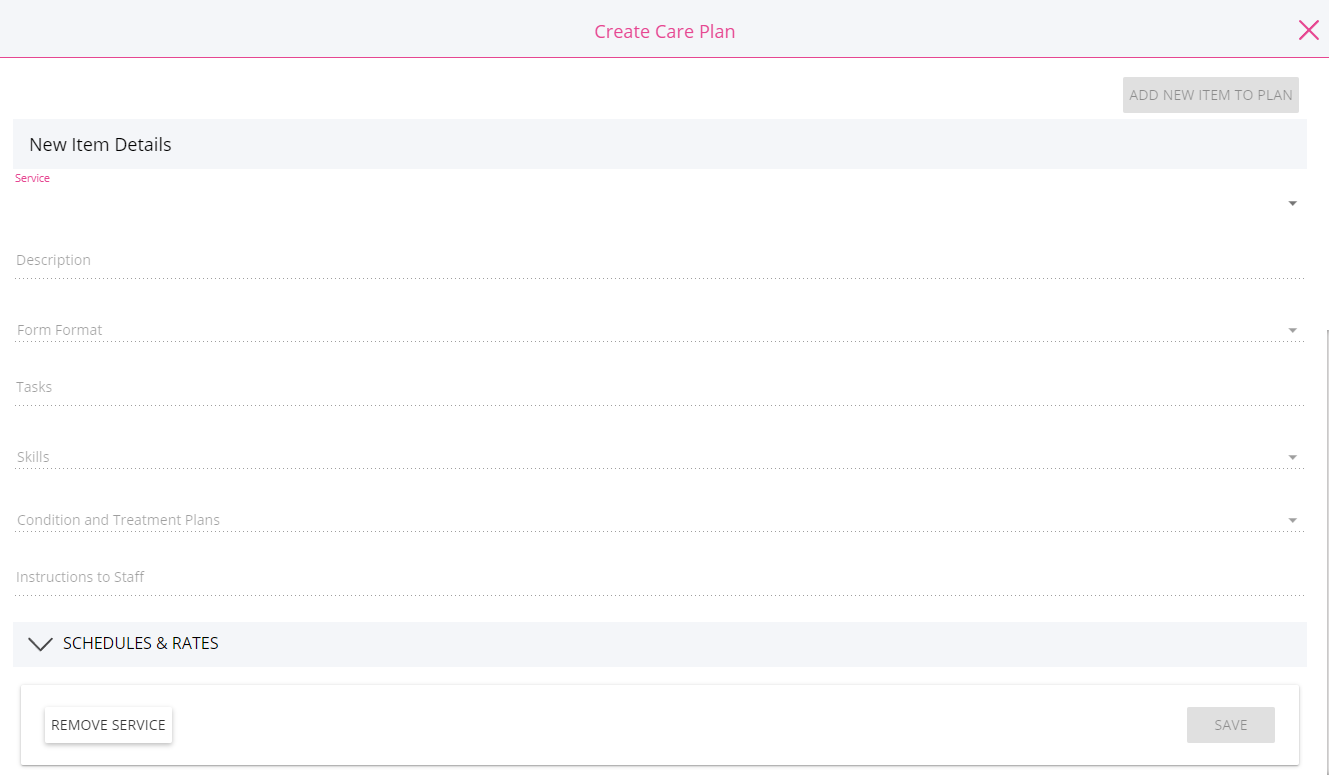
Depending on your organization's service template, the descriptions, form formats, tasks, and skills may have default content when you select a service from the list. This is something you can still modify to improve the client service you deliver. If you can't find the service you're looking for, it's possible that your client's funder doesn't support it. Some organisations have a rule that when enabled, to only show the services for which the client is funded.
It it highly recommended to link the service to the clients goals and treatment plan, this is useful to auditors since it allows them to quickly identify which services contributed to the client's goal and track its progress. (see KB for Understanding Goals Conditions and Treatment Plans ) .
You can select from a list of general tasks specific to the service you picked in the tasks area. For example, if you selected home cooking service, part of that service might be to prepare the ingredients, ask the clients preferred meal, or even clean up afterward. This is beneficial because it ensures that we do not forget even the most basic part of the service. If the task you want to add is not on the list, you can create a new one just by typing the tasks detail on the tasks field. However, don't be too precise while listing a task; some tasks, such as bathing the client with hypoallergenic soap , may imply invading the client's privacy.
In the Instructions to Staff section, you can write detailed descriptions of what the client expects and how the staff should do the tasks. This is included in the service and guarantees that the staff member understands exactly how to provide the service in the manner that the client expects.
Adding Forms, Tasks, Skills, and Instruction to Staff to care plan items
1. Navigate to People -> Clients and find the client's profile.
2. Expand the Care Plans section and click on the Update Care Plan button.
3. Find the service you are looking for.
4. Click on the Form Format field and select applicable form format(s).
5. In the Tasks section, type the task you want and hit Enter to save the task. When you type, relevant results of configured tasks will show up. You can click on the configured item, and it will be saved in the field.
6. In the Skills field, tick the desired skills in the dropdown list.
7. In the Instruction to Staff field, you can enter the instruction you would like to give to assigned staff. It can be a friendly reminder or a detailed requirement.
Care Plan Item Schedules & Rates
SCHEDULE DETAILS
- Schedule Type:
- Fixed Schedule - are services that needs to happen on a strict schedule. Examples are medication schedules and scheduled appointments.
- Flexible Schedule - are services that can be moved at a different time depending on staff availability, client schedule or request. An example are gardening services, personal care services, or any non-medical related activity.
- Frequency: Select the frequency on how this service should be delivered.
- Daily - Selecting this option will make this service available on a daily basis, a good example of this kind of service is Home Cooking.
- Weekly - When you select this option, the service you chose will be repeated weekly. Laundry is a good example of this.
- Fortnightly - By selecting this option, you will make this service available on a fortnightly basis, which means it will be delivered every two weeks. Garden trimming is an excellent example of this frequency.
- Poly-weekly - It's the same as fortnightly, with the exception that you can specify how many weeks must pass before the service will be repeated.
- Monthly (Date Based) - By choosing this option, the service will be repeated on a certain date each month; for example, accompanying the client to a medical checkup.
- Monthly (Week Based) - The only difference between this frequency and monthly date based is that by selecting this frequency, the service will be repeated on a specific day of the month.
- Yearly - By selecting this frequency, the service will occur once a year; for example, accompanying the client to an annual physical exam.
- Start/End On: This will define on when will the service will become active/inactive to the care plan. When you set the start date to the future, the service will only be active on the date you specify. You can also specify an end date if you want the service to end on a fixed period. Please keep in mind that if you leave the end date blank, the service will continue to run at the frequency you specify.
- Start/End Location: the options you can select in the location dropdown are the client home address, and the general locations saved in the organization. This is necessary for the staff to know where to go and for KM tracking.
SCHEDULE CARD
The schedule card may vary depending on the service Frequency you have chosen on the Schedule Details. However, regardless of the frequency you choose, you must indicate the time and duration of the service. You may also choose the preferred carer(s) for this service, by doing this those carer will be displayed as preferred on the scheduling recommendation page. (see KB for Scheduling Recommendation )
Deliver on Public holidays: select if the client wants the service to be delivered even on a public holiday, note that we must inform them that they may pay extra for this.
Sleepover: tick this box if this service will require a sleepover. (see KB article for Sleepover for more information)
Externally Delivered: If the service will be delivered externally, check this box.
If cancelled pay anyway: If the client must be billed even if the service booking has been canceled, check this box.
Use Default Funding Source: Aside from the funding source associated with this service, some clients may have default funding source(s). If this option is selected, the funding source associated with this service will be replaced by the client's current default funding source on generating the clients invoice.
Continuous on Leave: If the service must be delivered even if the client is on leave, select this option.
Continuous on Leave: If the service must be delivered even if the client is on leave, select this option.

PREFFERED CARER(S)
A list of staff requested by the client to deliver services for them.
Review the current schedule of shifts and add staff who are repeatedly working shifts on that particular day as preferred staff. For instance, Elizabeth works every Monday and Tuesday as requested by Client Jim so she would be added to just Monday and Tuesday as the preferred carer.
After adding the schedules, care managers need to add the following important financial details for the services.
This is a critical step in ensuring that the client's invoice is correctly recorded. Invoice discrepancies may occur if this is not properly configured.
Rates or Billing Categories: Choose the appropriate billing rate for the client. This is crucial since it decides the amount the client will be charged for the service. Some billing categories might be automatically selected here on the Create Care Plan window, if these billing categories are flagged as "active by default" for the specific service in Settings. Remember to go through all of them to make sure the selected billing categories actually apply in the client's case.
Funding Sources: From the dropdown menu, choose the funding source for the service. This phase is also critical because it is here that you associate the service to a funder for reporting and budgeting purposes.
Line Items:
- Manual line items - are additional service costs, consumables, and other goods that you must bill your clients for.
- Visit Duration - This line item describes how staff workers are compensated and clients are billed based on the amount of time it takes to deliver the service.
- Distance Traveled with Client - This line item will detail how staff will be compensated based on the distance traveled with the client. Eg. The client must be picked up from a specific location.
- Call out Fee - This line item covers the amount paid to the staff and/or the amount billed to the client for charges incurred between the previous and next appointments.
- Sleepover - This line item covers on how the staff will be compensated based on the sleepover.

You can copy your initial created schedule for services with multiple schedules. Simply click the COPY SCHEDULE button at the bottom left of the Schedule card. This is a huge time saver because you don't have to repeat information like billing details; all you have to do is change the day or time.
When you're finished with the Care Plan Item/Service, remember to click SAVE to save your newly added service to the Care Plan. If you want to add a new service, simply click on ADD NEW ITEM TO PLAN and follow the steps outlined above. When you're finished with the Care Plan details, return to the modal and click the SAVE button. By going to the Client Profile and selecting the Calendar, you can see if the Care Plan was successfully added to the client. There, you should be able to see all of the services you added to the care plan properly plotted based on their respective booking schedules.
When you're finished with the Care Plan Item/Service, remember to click SAVE to save your newly added service to the Care Plan. If you want to add a new service, simply click on ADD NEW ITEM TO PLAN and follow the steps outlined above. When you're finished with the Care Plan details, return to the modal and click the SAVE button. By going to the Client Profile and selecting the Calendar, you can see if the Care Plan was successfully added to the client. There, you should be able to see all of the services you added to the care plan properly plotted based on their respective booking schedules.
8. Scroll down to the bottom of this service and click on the small Save button to keep the changes to this one service in the client's care plan.
9. Click on the big Save button to keep the the changes to the whole care plan.
Related Articles
Configuring Funding Source Templates
What are Funding Sources Funding Source Templates define the standard parameters for client funding arrangements making it easy to assign and set up clients and quotes. When assigned to clients various additional details are captured that are client ...Funding Rules Explained
Background Funding Sources in CareVision and for each Client CareVision allows your organisation to setup preconfigured templates containing fees, services and billing categories that relate to a particular funding type. Configuring Funding Source ...Fees Billing Category Management
Why do we need Fee Billing Categories Fee Items and their associated Fee Billing Categories are a special type of billing category that allow an organisation to create recurring billing items that are not directly linked to the provision of a ...Manage Transport Services for Support at Home
This topic describes how to configure and manage transport services for Support at Home. It explains how to correctly set up and link billing categories, services, and funding source templates to support a smooth quoting and export process. Keywords: ...Using Client Leaves for Discount Treatments on Fees
What is a Client Leave Treatment? Client Leave refers to when clients require their services to be suspended while they are unable to receive services. Home care packages allow for specified number of days leave in a year without impacting funding, ...
Request an Article or Guide
We are keen to know what you want to know more about? Let us know on chat or raise a ticket for an article or topic you would like covered in more detail. We have a team of technical writers and learning content creators keen for your suggestions.