Managing Fleet Vehicles
Overview
Organisations often own pool vehicles to cater for the transportation needs of their client and staff. In this article, Care Vision will utilise the flexibility of its system by using the Shift pattern to provide fleet vehicle system to the client or staff. This will also be reflected through the billing and claiming to the client.
Setting up Fleet Vehicle using Shift Pattern
Shift Pattern will be used to create schedules for the fleet vehicle to be used to transport client and/or staff.
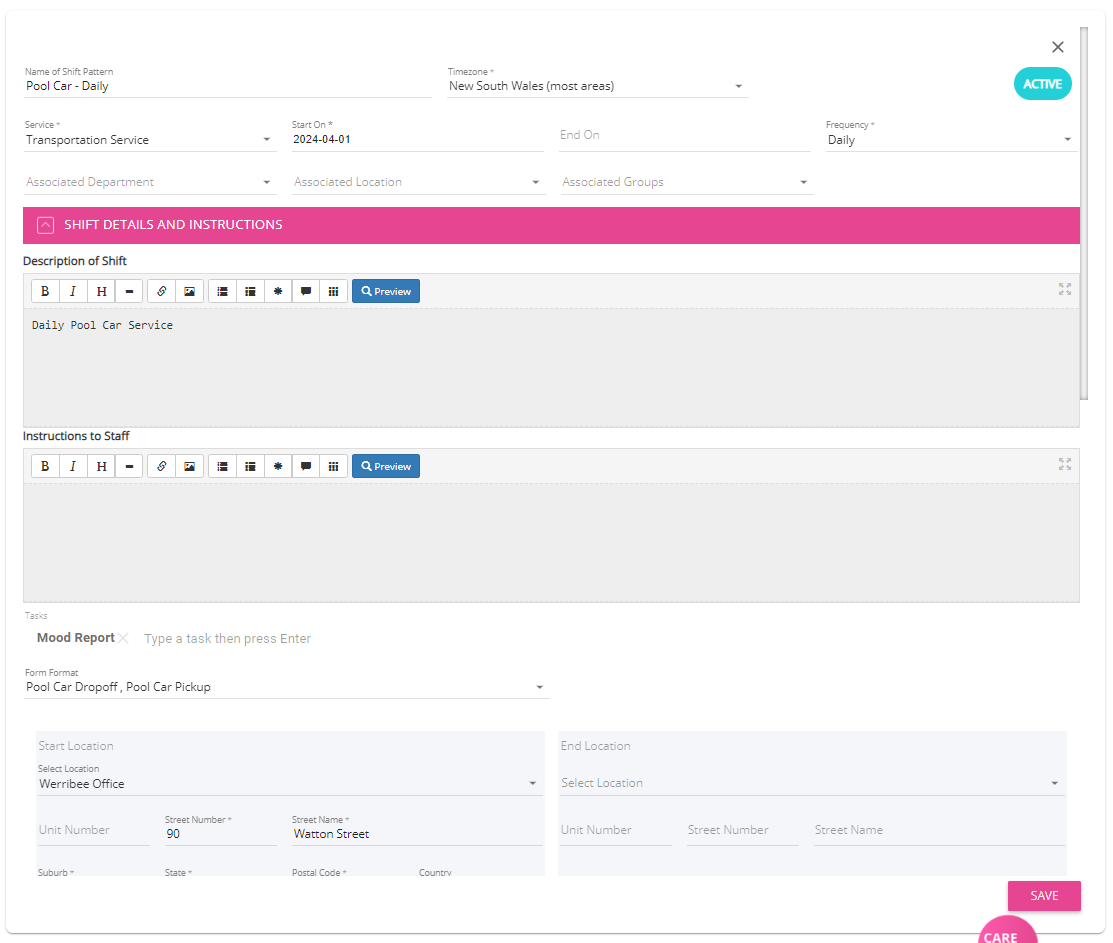
Name of the Shift - information such car model or car type will be the ideal name of the shift to easily identify the fleet vehicle that is being assigned for the transport of the client.
Service - this refers to the service related to transport for the client
Service - this refers to the service related to transport for the client
Start On - this will be the date the fleet vehicle can be used and allocated
Frequency - this refers to frequency of the fleet vehicle being used
Associated Department - this refers to the department associated to the client for easy filtering
Associated Location - this refers to the associated location that the fleet vehicles are assigned to
Description of Shift - additional information for the fleet vehicle can be added here, such as license plate, color and latest condition
Instructions to Staff - additional reminders and information for the fleet vehicle can be added here, such as maintenance and car cleaning before returning
Form Format - adding Form Formats such as Clock-on Questionnaire for Pickup and Dropoff, Car Condition checklist can be added here for the staff to submit after picking up the fleet vehicle and returning the fleet vehicle
Start Location - this refers to the location where the fleet vehicle has been picked up, this can be the office location or fleet vehicle parking. This will be used as the reference for the distance between the location going to the booking.
End Location - this can be used as reference as to where the distance will be measured of the last booking going to the added location in this field.

For instances that end location is not added, start location will be considered as the end location as well.
Skills - as part of required skills, Driver's License or Bus License will be needed.
Start Time - this refers to the start of the schedule of the fleet vehicle
Duration - duration can be defaulted to whole, this can still be adjusted based on the bookings per day.
Line Items - line items can be removed as the shift will be used as reference to calculate the distance for the transport of the client
Example:
Instruction to Staff may include few reminders. To have specific instructions to the staff, editing of the Instructions to Staff shall be done after it is allocated.
Form Formats attached is a clock-on questionnaire that is used to gather details for the Pickup and Dropoff information, more information and setup of the clock-on questionnaire is discussed in this article as well.
Assigning the Fleet Vehicle to a client with multiple bookings
In this part, scenarios will be demonstrated and explain on how the distance will be measured based on the booking and fleet vehicle allocated to the client.
The starting location of the shift will calculate the distance going to the 1st booking.
After checking in to the 1st booking, the distance will now be calculated from the location of the 1st booking going to the 2nd booking.
From the 2nd booking, the distance will now be calculated from the location of the 2nd booking to the 3rd booking.
From the 3rd booking, the distance will be calculated from the 3rd booking to the set end location of the shift pattern.
This shall cover all the booking assigned for the staff on that day and the distance from the last booking going back to the location of the fleet vehicle parking.
Adding Clock on questionnaire as form
Adding clock on questionnaire for the fleet vehicle helps in making the staff accountable to the fleet vehicle and the timesheet of the staff.
In this section, sample setup for a Clock on questionnaire that is useful for the fleet vehicle
Name of Form - this refers to the form name that will be appearing when being attached to the service, it is ideal to have the purpose of the form indicated in the name to easily identify what the form is for
Form is For - this refers to the profile that the form can be assigned to, in this case this is assigned to the Organisation User
Filter Who Can Access to Form - this refers to the security roles that can be able to access the form
Special Purpose Form - setting this to as clock-on questionnaire will make the form mandatory when clock-on to the service the form will be attached to,
Special Purpose Form - setting this to as clock-on questionnaire will make the form mandatory when clock-on to the service the form will be attached to,
Form Category - this refers to the category the form will under, in this example below, this is under Service and Shift Related Notes
Workflow - if the form is needed to be approved to be able to reflect on their profile, this can be also used as another level of approval for the check-in and check-out details for the service
Status - making the Status in Active will allow the form to be attached to the services
Form Structure - adding the necessary fields for the form will be setup here, such as Car Model, Time of Pickup, Time of Dropoff, Car Condition Checklist can be added here.
Example for the fleet vehicle Clock On Questionnaire as a Form
In this example, two (2) separate form for the Pickup of the fleet vehicle and Dropoff of the fleet vehicle were created and will be attached to the shift.
These can be used to reference the check-in and check-out for the shift for the fleet vehicle.
These can be used to reference the check-in and check-out for the shift for the fleet vehicle.
Sample Set up for the Pickup Pool Car Form:
Set up for the Dropoff Pool Car Form:
Related Articles
How to Assign Staff to a Shift Pattern with an Associated Social Group
This topic describes how to assign staff to a shift pattern with an associated social group. Keywords: shift patterns, staff scheduling, social groups, carevision scheduling, assign staff shifts, preferred staff allocation, autoscheduling, staff ...How to Schedule a Buddy Shift
Buddy shifts provide a structured way to onboard new staff while maintaining continuity of care for clients. This topic describes what a buddy shift is and how to schedule it in the Scheduling Board. Keywords: buddy shift, schedule board, duplicate ...Auto Schedule
Overview Auto scheduling allows organizations to manage the assigned carers who can work on the services for the clients. Based on the size of the organisation, it can be quite a tedious task in managing a whole staff roster in which the staff ...Staff Leave & Their Schedule
In this article, we will discuss the importance of the work schedule and leave schedule of the staff member, their differences, their usefulness and some scenarios for the coordinator's understanding of this module. The different types of schedules ...Using the "Auto Schedule" Feature to Create your Staff Roster
Overview The Auto Schedule feature on the CareVision Management Portal's Scheduling Area allows Coordinators to take all unscheduled bookings and match them with the appropriate Staff Member. This will be based on their Work Availability schedule (if ...
Request an Article or Guide
We are keen to know what you want to know more about? Let us know on chat or raise a ticket for an article or topic you would like covered in more detail. We have a team of technical writers and learning content creators keen for your suggestions.