LanternPay Integration
Prerequisites

Before doing the actual integration to LanternPay, we need to make sure that we have all the required credentials first. We also need to properly set up the client's records within CareVision.
Here are some of those requirements:
- LanternPay Username and Password - This will be povided by LanternPay after TLC's successful registration to their system. This will only be used once by the person from TLC who will do the integration process within the CareVision website.
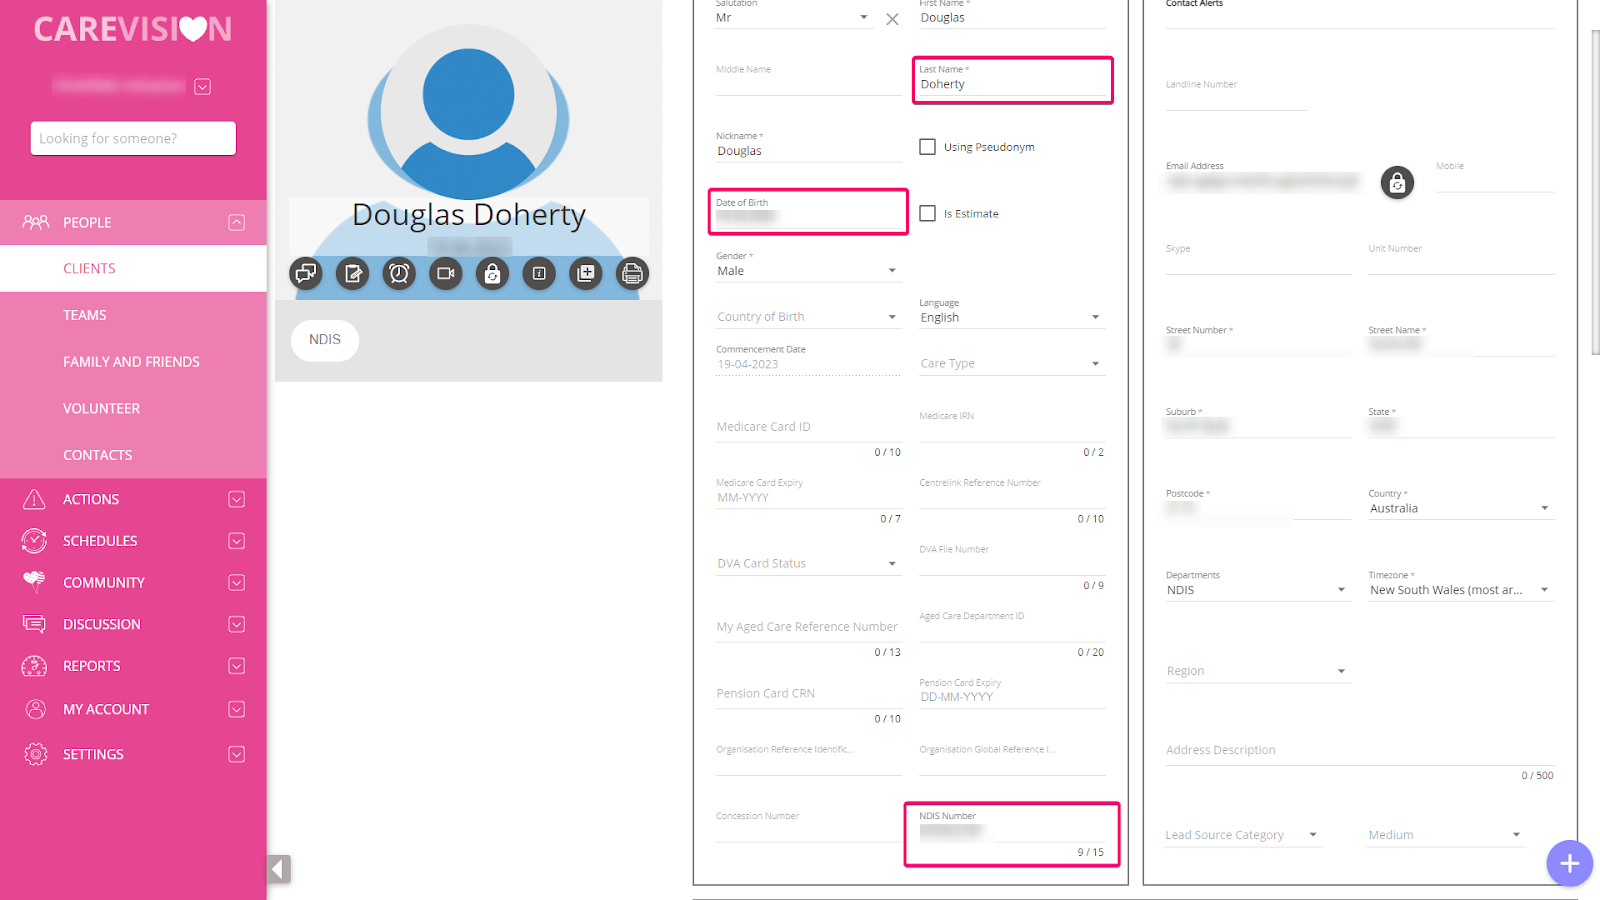
- Clients' Records - The main requirement for a client to sync with LanternPay is the NDIS number. But there are also some fields that need to be populated to do a successful integration such as:
- NDIS Number - All clients that have an NDIS number in their profile will be automatically synced.
- Last Name - Make sure that the value matches the clients' record within NDIS.
- Date of Birth - Make sure that the values match the clients' record within NDIS.
- Funding Source and Fees - During the initial integration, CareVision will try to compute the existing Care Plan of the client and match it to their Service Bookings. However, it will only consider NDIS-based records based on these criteria:
- Funding Sources:
- Funding Type - name should contain "NDIS" or "NDIA".
- Management Type - should be "Agency Managed".
- Fees - should be selected in the "Fee Items" field of the Funding Source.
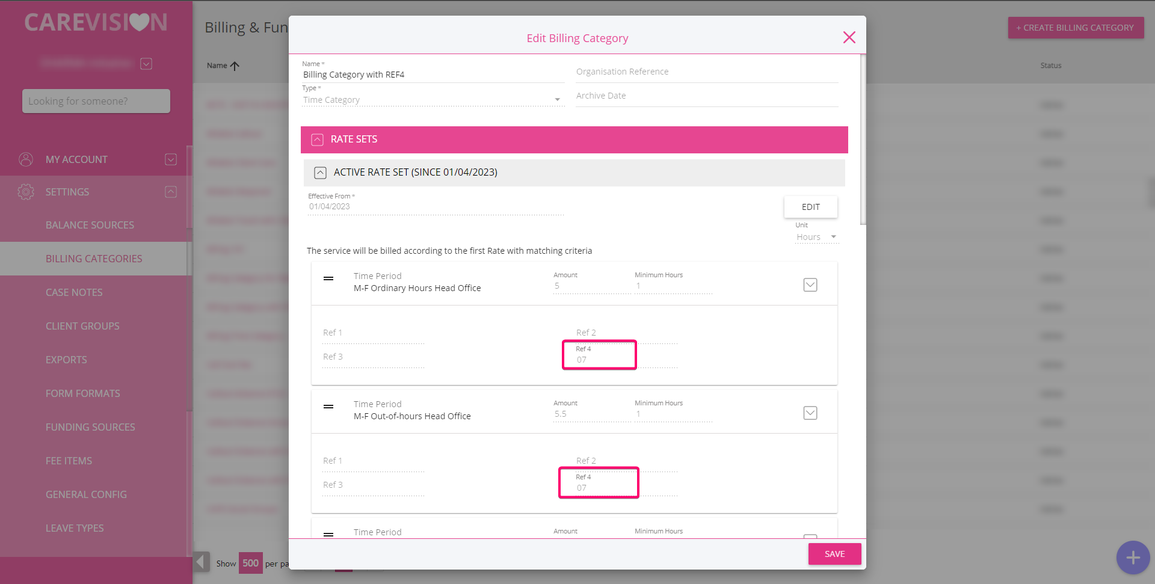
- Billing Categories - This will be the basis for the creation of Service Bookings on the NDIS side.
- Reference 4 (ref4) - Under the Billing Category Ratesets section within CareVision, the ref4 field should be populated with the correct NDIS item code.
 Do not share these credentials with anyone!If a Care Plan Item, Ad-hoc Booking or Fee is using the Funding Source above, it will be automatically be included in the syncing process.
Syncing Process
There are 3 events that will trigger the syncing process:
- Initial Integration - this will initiate after a successful integration of your organisation to LanternPay within the "Integration" section of CareVision. Syncing will be initiated to all active members with an NDIS number. In this stage, several processes are happening in the background:
- CareVision will fetch the clients' NDIS plans and Service Bookings.
- The client will be subscribed to LanternPay.
- Clients' Care Plan Items, Ad-hoc Bookings and Fees within CareVision will be calculated and associate with the fetched Service Bookings.
- Updating or Adding of NDIS number - this will trigger a sync or resync (if update) for that particular client.
- Quote Acceptance - it is expected that the initial sync is already done before creating a quote, so when this event happens, the only remaining thing to do is to create the needed Service Bookings based on the client's quote items.
The Syncing of the Client's NDIS Plans and Service Rates
The syncing of NDIS Plan and Service Rates from LanternPay to CareVision happens during below:
I. Initial Integration of LanternPay
During the initial integration of LanternPay for an organisation, we also synced the NDIS Plan and Service Bookings of clients from LanternPay to CareVision.
The following are the date used as criteria for checking for the syncing of NDIS Plans and Service Rates for the clients:
- Last Name
- Date of Birth
- NDIS Number
II. Updating of the NDIS Number from the Client Profile
This will only happen if the organisation is currently connected and integrated to their LanternPay organisation account. In the client profile, we have the option to update the existing NDIS number.
To do this:
- Open the Client Profile
- Update the NDIS number in the Detailed Profile.
- Save
Once saved, this will automatically be synced to LanternPay.
The following are the data used as criteria for checking when updating the NDIS number:
- Make sure that the Last Name of the Client is provided.
- Make sure that the Date of Birth is provided.
III. After Accepting a Quote from a Lead Client
This will also happen if the organisation is currently connected and integrated to their LanternPay Organisation account. In the Client Profile, we have the option to update the status of the active Quotes.
To do this:
- Open Client Profile
- Go to Quotes and Contracts
- Click on the Edit button to open Quote details
- Quote Status drop down, select Accept
- Save Quote
To ensure that the Quote will sync on the LanternPay, here are the conditions:
- The Quote Type should be NDIS
- The Reference Code should be NDIS on the Fund Source
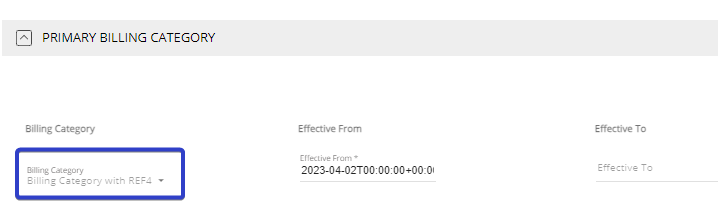
- On the Fees and Charges, select Billing Category with ref4 which should be related to the LanternPay.

Please see the creation of Billing Category on the Setting-up the Value of Reference for Billing Categories section below.
4. Select Services with Billing Category that are associated with ref4 on the
Recurring Services and Once-off Items. See example below:
When all conditions are met, the user can now update the Status of the Quote.
Below are the following status that triggers the sync on LanternPay:
- Accepted
- Accepted - Verbally
The expected outcome after accepting the quotes are the following:
1. A modal will display and show the NDIS Service Booking
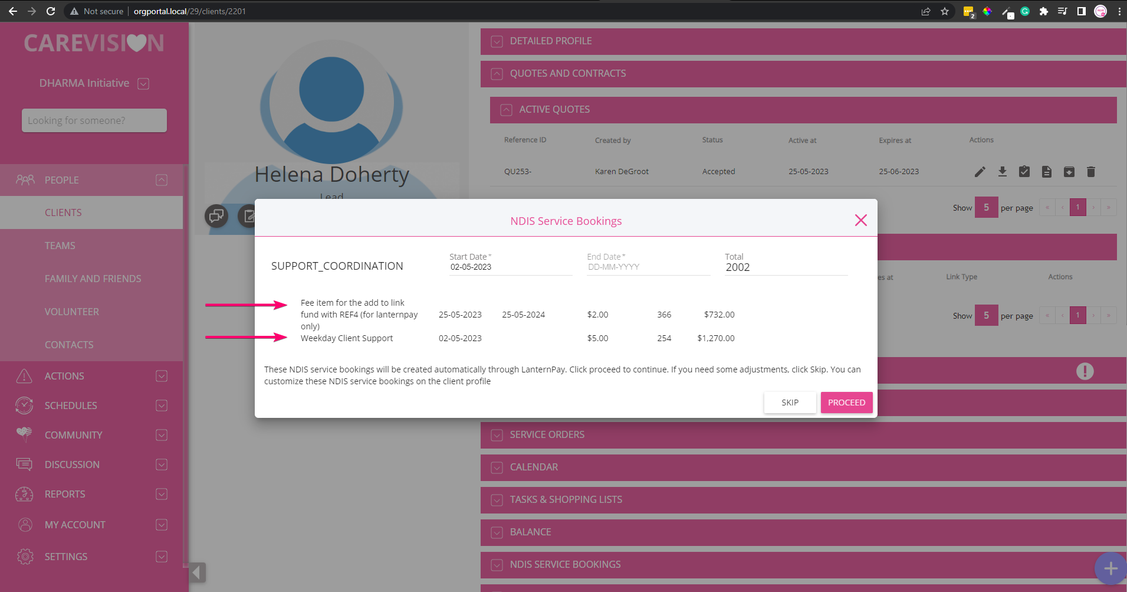
2. The usual creation of the data (if Funding Source, Fees and Charges, Recurring Services, and Once-off are provided, it should be created.
3. The Service Booking should also be created.
Setting-up the Value of Reference for Billing Categories
The creation of Billables for the client is also included during the integration of LanternPay for the Organisation.
We need to make sure to check these guidelines for the proper setup of the Funding Source:
- The values for the Budget and Funding Type (and Reference) should be NDIS or NDIA.
- The selected Management Type should be Agency Managed.
- For the Fee Items and selected Services, as much as possible, the selected Fee Item template should have an associated Billing Category with Reference for Item Categories of the NDIS.
Creation of the Organisation's Funding Type Reference for NDIS and/or NDIA
For the creation of Funding Type References such as NDIS or NDIA:
- Navigate the Settings > Funding Source
- Click the Create Funding Type Reference button
- Select the Funding Type Reference
- Save
Proper Set-up of the Client's Funding Source
Below are the sample created Funding Source of a client:
1. Management Type should be "Agency Managed"
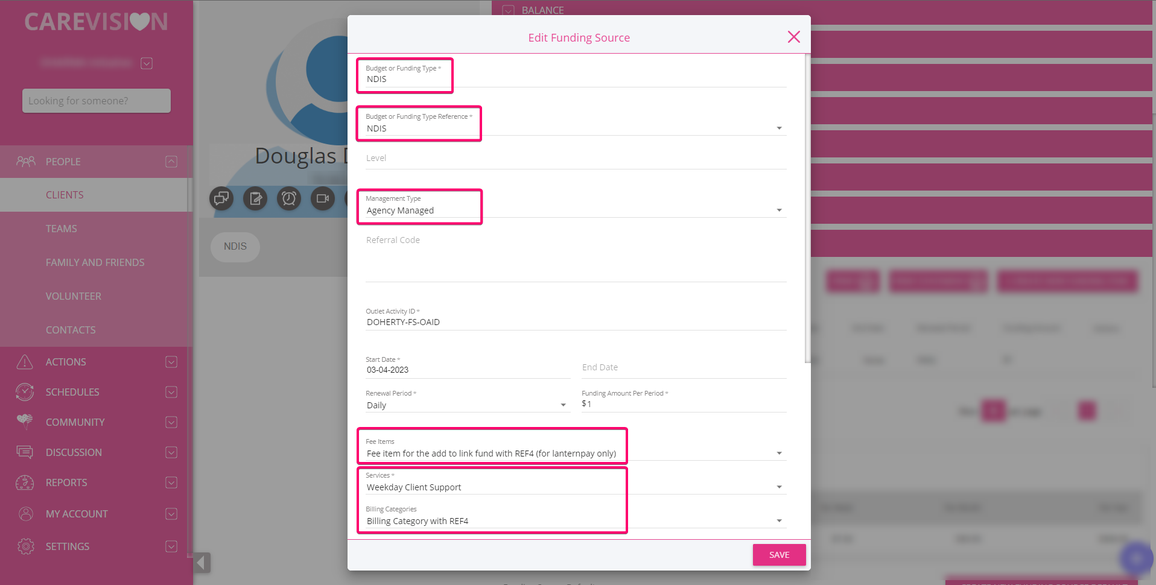
2. Next, create Client Fee: Because we selected a Fee Item template from the Fee Items section in the Funding Source we created above, we also need to use it for the creation of the Fee.
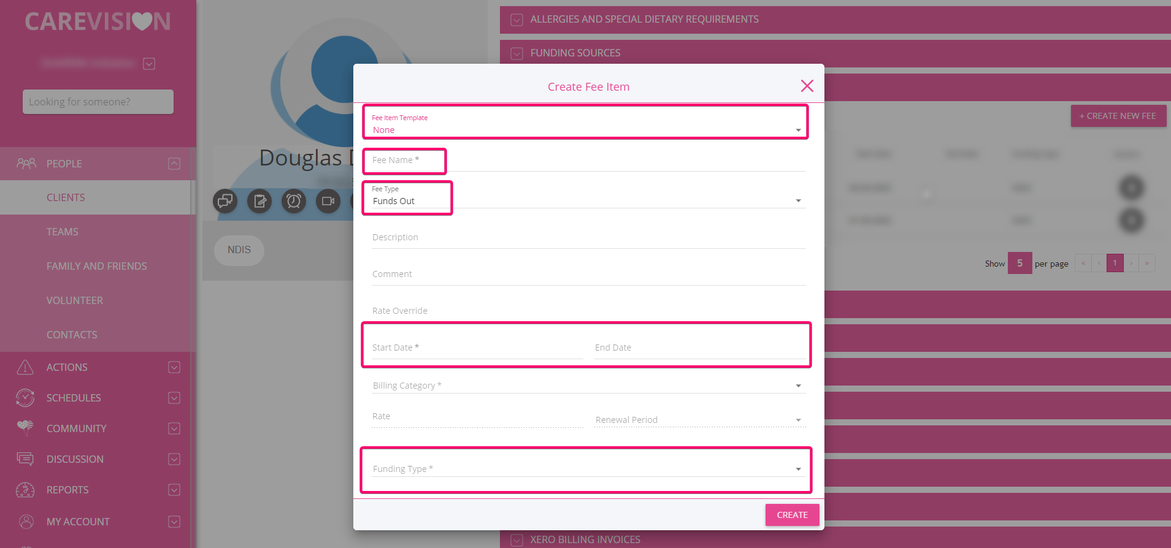
Below, the fields with boxes are the sections that we need to provide data:
- For the Fee Item template, we need to make sure that we will select the one that is selected on the Fee Item section from the Funding Source.
- For the Funding Type, will be the set Funding Type from the Funding Source (which could be an NDIS or NDIA).

Related Articles
LanternPay (HICAPS) Integration Guide
The LanternPay (HICAPS) integration allows care organisations to submit payment requests directly to the NDIA for services provided to NDIS Agency Managed participants. Registered NDIS organisations can connect their HICAPS account in CareVision to ...Employment Hero Integration Guide
The Employment Hero and CareVision integration streamlines payroll processing by automatically transferring employee data, such as timesheets and pay details between systems. Information syncs from CareVision to Employment Hero for employee records. ...Processing Pay Runs to Employment Hero
Before you process a pay run, you must review and approve timesheets in CareVision. Once timesheets have been submitted from CareVision, payroll admin users should complete the required steps in Employment Hero to process the pay run. This topic ...How to Generate TechOne Payroll Export Files through Employment Hero Integration
This topic describes how payroll admin users and coordinators can generate TechOne payroll export files through Employment Hero integration. The payroll workflow involves three key systems, each with a distinct role in managing bookings, timesheets, ...JobAdder and Carevision Integration
JobAdder - CareVision Integration Background The JobAdder - CareVision integration will allow the organizations to simplify the onboarding process of staff professionals in CareVision once they are hired through JobAdder. Personal details of the ...
Request an Article or Guide
We are keen to know what you want to know more about? Let us know on chat or raise a ticket for an article or topic you would like covered in more detail. We have a team of technical writers and learning content creators keen for your suggestions.