Providing quality care to clients often requires coordination between different people and organisations. To meet each client’s needs, a care organisation may engage contractors to provide specific services.
CareVision provides the Contractor add-on module to help streamline the assignment and management of contractor services. This document provides a step-by-step guide to contractor workflows, from organisation setup and contractor profile creation to quoting and job awarding.
To help you navigate these workflows, here are some key terms you need to know before getting started:
Term
Definition
Client
The person receiving care or support services, such as an older adult needing help at home.
Organisation
The main care provider that assesses client needs and arranges services, either with its own staff or by engaging contractors.
Contractor
A Contractor is an external organisation engaged by a care provider to deliver services to clients under a formal service agreement. In CareVision, contractors are set up as organisation profiles with business details, hours of operation, services offered, and associated rates. Contractors provide their own workers to deliver the service and are responsible for managing those workers.
Award Request
An Award Request is initiated when creating a client quote that specifies the detailed services required by the client. If a contractor matches the required service and is available to provide it according to the client’s specific requirements, the coordinator can send an Award Request. The contractor reviews the award request and can choose to approve or decline it. Submitting interest to the Award Request does not guarantee that the job will be awarded to the contractor.
Awardee
The awardee is the contractor chosen to do a client’s care service after award requests are reviewed. For example, if three contractor candidates are considered and one is chosen, that contractor becomes the awardee and receives the service agreement.
Award
An award is the official assignment of a job to a contractor after the client accepts the quote and the contractor agrees. It can also include the basic rules, pay rates, and conditions for doing the job.
Offered Services
Offered services are care or support tasks that can be made available to contractors based on the organisation’s settings. Only services marked as available will be seen and selected by contractors when award requests are sent.
Step-by-step Process
I. Organisation Setup
This section describes the settings you need to configure for contractors to work with your organisation. To complete the setup, follow these steps:
A. Access Service Settings
A. Access Service Settings
Go to the Settings menu on the left side of the screen.
Select Services.
The Service Offerings will display the organisation’s list of services.
B. Specify Services Contractors Can Provide
B. Specify Services Contractors Can Provide
You can determine which services are available for contractors to provide. This ensures that only the appropriate services are made available to contractors within your organisation.
Click the name of the service you want to edit.
The Edit Service form will open.
Find the Available for Contractors? checkbox.
To allow contractors to provide a specific service, check the box. Example: If checked, contractors can provide Interpreting And Translation services.
If you want to prevent contractors from providing a specific service, leave the box unchecked.
C. Specify Request Validity
C. Specify Request Validity
If you check the Available for Contractors? checkbox, the Request Validity field will appear. Enter the number of days a contractor has to accept an award request for that service.
Example: Enter 1 for urgent services that require a response within 1 day.
Use a longer validity for less urgent services.
Click Save.
D. Set Up Form Formats
D. Set Up Form Formats
Set up the form format to be used for generating service agreements for contractors.
With your organisation settings in place, you can start onboarding new contractors. Create a contractor profile and fill in all required fields, as this information is important for payroll and other workflows.
A. Create a New Contractor Profile
A. Create a New Contractor Profile
Go to the left menu and click People.
Select Contractors from the submenu.
Click + Create New Contractor to start a new contractor profile.
The Create Contractor form will appear. Complete all required fields with accurate information.
Refer to the table provided for a description of each field to help you enter the correct details.
Field
Definition
Username
Unique login name for the contractor
Password
Password for contractor login
Note: There are currently no password requirements, as login credentials will not be used or provided to any contractors at this time. Contractor access to the system is still under consideration and may be implemented in the future.
Company Name
Legal name of the contractor’s company
Trading As
The business’s trading name, which is the shorter or commonly known name of the company
Unit Number
Unit number of business address
Street Number
Street number of business address
Street Name
Street name of business address
Suburb
Suburb of business address
State
State where the contractor is based (Australia)
Postcode
Postal code of business address
Country
Country where the contractor operates
Timezone
Time zone of the contractor (Australia)
Language
Preferred language of the contractor
Primary Contact Email
Main email for notifications and job assignments
Mobile
Contractor’s mobile phone number
Landline
Contractor’s landline phone number
Contact Alerts
Preferred method for receiving urgent notifications (such as SMS, email, or phone call)
Emergency Contact Number
Number to reach in emergencies
TechOne Creditor ID
Internal system ID for TechOne integration, used for financial and system integrations
ABN
Australian Business Number
ACN
Australian Company Number
Security Role
Specifies the contractor's access level and permissions in CareVision (independent of job title) to control what features and data they can access.
Contractor’s active circle scope security role. By default, this field is set to Active Contractor.
Inactive Circle Security Role
Contractor’s inactive circle scope security role. By default, this field is set to Inactive Carer.
Departments
Departments assigned to the contractor; ensures assignment to suitable jobs and clients.
Contractor Type
Specifies the role or category of contractor
Regions
Service regions assigned to the contractor; ensures availability for jobs in the correct areas.
Do not send to CareVision Payroll
Excludes contractor from CareVision payroll processing; used when payroll is managed externally.
At the bottom left of the form, check the box to agree to the Terms of Use.
Click Save to finish.
B. Complete the Detailed Profile Section
B. Complete the Detailed Profile Section
After creating a new contractor profile, go to the Detailed Profile section to review the details and complete all required fields.
Go to the left menu and click People.
Select Contractors from the submenu.
Click the contractor’s name to open their profile.
Select the Detailed Profile section.
Review to ensure all information entered in the fields is correct. Most of these fields should already be filled from previous steps when creating a new client profile. You can update existing fields or complete any blank fields to finalize the profile.
Below is a table describing each field in the Detailed Profile section that does not appear in the Create Contractor form. For definitions of other fields, please refer to the table above.
Field
Definition
Contract Established Date
The date the contractor’s agreement officially begins.
Contractor End Date
The date the contractor’s engagement is scheduled to end.
Contractor Termination Reason
Records the reason for ending the contractor’s engagement for future reference.
Team Member type
Specifies the contractor’s role or classification within the team.
Onboarding Status
Indicates whether the contractor is fully set up and eligible for work assignments. This field can be set to Ready for Work once the contractor has been assigned the appropriate contractor type, required skills, and relevant departments, helping ensure that only eligible contractors are available for scheduling and service allocation.
Skype
Contractor’s Skype username for communication. (As of May 5, 2025, Skype is officially retired)
Work Phone
Primary phone number used for work-related calls.
Work Mobile
Mobile number for work-related contact.
Work Fax
Fax number for sending or receiving work documents.
Work State
The state or region where the contractor is based for work purposes.
Secondary Contact Email
An additional email address for backup communication.
Click Save Changes to apply your changes.
C. Complete the Hours of Operation Section
C. Complete the Hours of Operation Section
This section allows you to specify the days and times the contractor is available to work. This information ensures accurate scheduling and service allocation based on the contractor’s availability.
In the contractor profile, click the Hours of Operation section.
Click +Create Work Schedule.
Enter a descriptive name for the schedule in the Schedule Name field.
In the Schedule Type dropdown, select either Ordinary Work Schedule, Leave Schedule, or Contract Hours.
In the Schedule Start Date (inclusive) field, select the first day the schedule begins using the calendar.
In the Schedule End Date (exclusive) field, specify the last day the schedule applies using the calendar.
For each day, enter the contractor’s Start Time (Example: 09:00 AM).
For each day, enter the contractor’s End Time (Example: 05:00 PM).
Enter the Break Start Time (unpaid) (Example: 12:00 PM).
Enter the Break Duration (in minutes) (Example: 30).
When finished, you can set other days individually or click Copy to All to apply the same schedule to all days.
Click Save to manage and record the contractor’s availability.
The schedules you’ve created will appear under the Hours of Operation section.
D. Complete the Offered Services Section
D. Complete the Offered Services Section
In the contractor profile, click the Offered Services section.
View all services currently provided by the contractor.
Click +Add Offered Service to begin adding a new service to the contractor’s profile.
In the dropdown, select the services you want to add. You can add multiple services at once.
Note: The services shown are your organisation's current offerings. If a service is missing, go to Settings, click Services, and then click +Create New Service Offering. Once added, the service will appear in the dropdown.
You can also type the service name in the search box to quickly find and add it.
Click Save to confirm and add the selected services to the list.
In the Status column, view the current status of each service to monitor which services are active, inactive, or paused.
To manage or update a service status, click the pen icon under the Actions column, allowing you to make changes as needed.
Click the dropdown under the Status column and select the appropriate status such as Active, Inactive, or Paused, so the service reflects its current availability.
If you select Paused, specify the pause effective start date using the calendar to clearly define the period when the service is unavailable.
Specify the pause effective end date using the calendar.
Click the X or checkmark under the Actions column to save your changes and ensure updates are applied.
To remove a service, click the trash icon next to the service, which helps keep the list accurate.
A pop-up warning will appear to prevent accidental deletions. Click Yes to confirm removal or No to cancel.
E. Specify Rates in the Offered Services Section
E. Specify Rates in the Offered Services Section
In the Offered Services section, you can set or update the rates for each service provided by the contractor. This ensures accurate billing for each service.
To view or update rates, click the dollar ($) sign next to a service. This displays the current rates set for that service.
For example, you will see the default rates charged by the contractor for Personal Care service. This helps you verify existing rates.
If a contractor needs to charge different rates for the same service depending on the scenario, such as a higher rate for Complex Personal Care, click +Add Service Rate. This allows you to capture rate variations for accurate billing.
Note:
Only Time Categories and Distance Travelled with Client Categories are supported.
Rates added to one contractor profile cannot be reused for other contractors.
At this time, Billing Categories for contractor service rates can be added, however, a dedicated page for viewing these categories is not yet available.
The Add Service Rate card will appear.
Click the Billing Category field.
The Billing Category field displays a list of service types for the rate. Selecting the appropriate category ensures accurate billing for each service.
Specify the Effective From date using the calendar. This specifies when the new rate will start.
Specify the Effective To date using the calendar. This specifies when the rate will end, if applicable.
You can check the Active By Default checkbox if you want to set the rate as active by default. Rates flagged as Active by Default will be included in job requests automatically.
Click Save to add the new rate and ensure your changes are recorded.
In the Billing Category field, you may also click +Create New Rate if you would prefer not to select from the existing list.
In the pop-up, specify the Name field. This names the new billing category for easy identification.
Specify the Type field. This defines the nature of the billing category, such as Time Category.
Enter the Organisation Reference. This links the category to your organisation’s records. Enter the Archive Date if needed. This sets when the category should be archived.
To set rate details, click Draft Rate Sets.
Then, click Create Draft. This step allows you to define the specifics of the new rate.
In the draft, specify the Effective From date. This sets when the draft rate applies.
Specify the Unit, such as per hour, minute, or booking. This determines how the rate is calculated.
Enter the Amount for each time period. This sets the price for each applicable time.
Set a Default Rate in the the Time Period Default (Used if no other category matches) field. This covers any times not specifically listed and ensures all scenarios are billed.
Remove any time brackets that do not apply by clicking the trash icon.
Click Save next to the Draft Rate Set to record your draft changes.
Click Publish to make the draft rate active.
Scroll down and click Save again to apply the new or updated rate to the service.
The system will return you to the list under the Add New Service Rate card. Specify the Effective From date again to confirm when the new rate should start.
Click Save to confirm and finalize your changes.
F. Complete the Qualifications Section
F. Complete the Qualifications Section
This section allows you to add qualifications and record important credentials such as licenses, insurance certificates, and other compliance documents. This ensures all necessary contractor credentials are documented and easily accessible for compliance and verification purposes.
Click Qualifications to access and manage contractor credentials.
Click +Add Qualification to begin entering a new qualification for the contractor.
The Create Staff Qualification pop-up window will appear.
In the Qualification field, select the appropriate qualification from the dropdown. This ensures the correct credential is tracked for the contractor.
Based on the qualification you select, relevant fields will appear for you to complete.
Enter the Obtained Date to record when the qualification was received. This helps track the validity period of the credential.
Enter the Certificate Validity to specify how long the qualification remains valid. This ensures timely renewals and ongoing compliance.
Enter the Certificate Number to uniquely identify the credential. This helps in verification and record-keeping.
Enter the Certificate ID for additional unique identification if required. This provides another reference for tracking the qualification.
Go to the Attachments section to add supporting documents for verification. Supporting documents are necessary for proof of compliance.
Click Add Files to upload documents such as licenses or insurance certificates. Uploading these files provides evidence of the contractor’s qualifications.
After you select a file from your computer, the Add File form will appear. This form allows you to provide details about the uploaded certificate.
Specify a title for the certificate.
Specify a description of the certificate. The description provides context or details about the certificate’s purpose.
Click Add to upload the certificate.
The certificate will appear under the Attachments section. This section displays all supporting documents for easy reference.
Under the Actions column, you can manage the certificate. This gives you control over editing or removing files as needed.
You can click the pen icon to edit the file.
Editing allows you to update the title or description if necessary.
Click Update to save any changes made during editing.
You can also click the trash icon to delete the certificate. Deleting removes outdated or incorrect documents from the profile.
Click Save.
The qualification you added will be displayed in the Qualifications section.
G. Complete the Skills Section
G. Complete the Skills Section
This section helps you keep track of the skills each contractor needs for their job. It shows all the skills required for a contractor to be active.
Click the Skills section in the contractor’s profile to access and manage the skills relevant to the contractor’s role.
Under All Staff Skills, review the columns Skill, Description, and Qualification to verify all qualifications and skills previously added for the contractor.
Click a qualification for detailed review or update of that qualification.
Review each field in the View Staff Qualification form to check if the information is correct or up to date, ensuring compliance and accuracy.
When finished reviewing, click Close to exit the form and return to the Skills section.
To add a new skill, click +Add Skill to keep the contractor’s profile current with all required competencies.
In the Create Staff Skill pop-up, click the Skill field and type a skill.
After typing, select the appropriate skill from the list that appears.
Click Save to add the new skill to the contractor’s profile and update their qualifications.
The skill you added will now appear under the All Staff Skills section.
Note: If a contractor becomes non-compliant (for example, their certification or contract expires), the system does not automatically pause their availability. Future shifts won’t be auto-allocated, but they can still deliver services unless action is taken.
H. Manage the Exclusions Section
H. Manage the Exclusions Section
You can specify exclusions for contractors and clients. This allows you to prevent specific contractors from working with certain clients.
Click the Exclusion section to view all clients with current exclusions.
Click +Create New Exclusion to open the form and update contractor-client relationships as needed.
Click the Client Name field and select from the list to apply the exclusion to the correct client in the contractor’s profile.
Specify the Reason for exclusion to document the justification for this action.
Select the Date to record when the exclusion starts for accurate tracking.
Select the End Date if known to set how long the exclusion will last.
Click Save to finalize and apply the exclusion, updating the contractor’s profile accordingly.
Your new exclusion will appear in the Exclusions section, so this contractor will not be suggested for the specific client when creating a quote.
I. Manage the Pause Job Availability Section
I. Manage the Pause Job Availability Section
This section allows coordinators to set periods when a contractor is unavailable for award requests, helping prevent scheduling conflicts and ensuring contractors are not assigned work during their specified pause.
Click the Pause Job Availability section.
Click +Create Pause Schedule to start a new pause entry.
The Schedule Name field is auto populated for easy identification.
Specify the pause start date to define when unavailability begins.
Specify the start time to specify the exact beginning of the pause.
Specify the pause end date to set when the contractor’s unavailability ends.
Specify the end time to mark the exact end of the pause period.
Select the leave type to determine how job assignments are affected.
If choosing Pause Availability-No New Work, contractors can finish current jobs but not accept new ones during the pause.
If choosing Pause Availability-No Work, contractors cannot work on any jobs during the pause.
Add a short note in the Note section to provide context for the pause.
Click Save to record the pause schedule.
The new pause record will appear in the Pause Availability section.
Click the leave name to review or edit details if needed.
You can edit the pause schedule to update the contractor’s availability details.
If you made any changes, click Save to update the record.
Click the trash icon to delete the pause if it is no longer required.
A prompt will appear asking if you are sure you want to delete. Click Yes to confirm or No to cancel.
Note: In the Contractor Recommendations section on a client’s quote, any contractor who is on leave during the scheduled service period will automatically be excluded from the list of available contractors.
IV. Review Contractor Recommendations and Select Contractors
After you specify the client’s service needs, review the list of recommended contractors. This helps ensure you consider only contractors suitable for the selected service.
Check whether the Contractor Recommendations section appears under Recurring Services or Once Off Items.
Note: Contractor Recommendations will only be visible if the service selected for the booking has the Available for Contractors box checked in its initial settings.
Click Contractor Recommendations or click the arrow down to expand the Contractor Recommendations section.
By default, the Qualified Contractors Only checkbox is ticked when you click Contractor Recommendations. This ensures that only contractors who meet the required qualifications are displayed, helping you quickly identify suitable options.
If you want to view all available contractors, including those who are not qualified, you can simply untick the checkbox.
Alternatively, use the Region, Department, or Search fields to further narrow down your options.
In the Contractor Recommendations section, contractor options are displayed. The section includes columns for Contractor Name, Email, Mobile/Landline, Comments, Status, and Actions.
To the left of the contractor’s name, a yellow exclamation point icon inside a circle may appear. This icon indicates there is an important note about the contractor that you should review.
Partial Availability:
For example, it may show that the Contractor Has Only Partial Availability, meaning they are qualified for the job but may not be available for all required times. This feature helps you decide if the contractor is the best fit. Always check this icon for important notes to consider.
In the Comments column, you’ll find comments from both the coordinator and the contractor, recorded as part of the award request process.
If you click on a specific comment, the full comment history will be displayed. This allows coordinators to easily track and review all communications related to the request.
Note: Comments highlighted in pink are from the organization’s side, such as the coordinator, while comments in white are from the contractor.
For each contractor you want to consider, click Send Award Request in the Actions column. Sending an award request invites the contractor to review and consider the job offer.
When you click Send Award Request, the Contractor Service Rates popup will appear. This allows you to review and select the appropriate service rates before finalizing the award request. Service rates are configured in the Offered Services section of the contractor’s profile. Make sure these are set up so they are available for selection here.
Review the rates, add any necessary comments in the Comment box, and then click Save.
Click the arrow to collapse the Contractor Recommendations section.
V. Send Quote to Client for Review
Change the Status field of the quote to Open when you are ready to discuss the quote with the client.
Scroll down and click Generate PDF. This generates a corresponding PDF of the quote, which you can present to the client for their review.
VI. Contractor Receives and Responds to Award Request
The contractor receives an email notification containing a secure link to the award request page once the coordinator sends the award request and the quote status is set to Open. The email notifies the contractor of an award request for a service and informs them of a potential job opportunity with the Organisation.
See How Contractor Receives and Responds to Award Request
Contractor Receives and Responds to Award Request
The contractor receives an email notification containing a secure link to the award request page once the coordinator sends the award request and the quote status is set to Open. The email notifies the contractor of an award request for a service and informs them of a potential job opportunity with the Organisation.
The contractor clicks View Job Details to access the award request details.
After clicking View Job Details, the system sends a security code that the contractor must use to access the Job Details.
The contractor enters the security code into the screen as prompted.
Upon successful entry, the page displays all award requests for the contractor, each with its corresponding Job Offer ID.
When the contractor clicks the downward arrow next to a job, the system expands to show the Job Opportunity details, including the following:
Service details: Lists the date, name, period, frequency, time, and location of the service being offered.
Coordinator comments: Provides any additional notes or instructions from the coordinator.
Rate offered: Shows the rate the contractor will be paid for providing the service.
Coordinator name and date: Identifies the coordinator who issued the job request and the date it was sent.
Response due date and time: Indicates the deadline for the contractor to respond.
A response disclaimer, stating that submitting interest does not guarantee the job.
Below these details is the Response section. Here, the contractor can choose one of the following options:
Express Interest: Indicates willingness to accept the job as described.
Express Interest with Changes: Indicates interest in the job but requests modifications. The contractor can specify the requested changes in the comment section.
Not Interested: Declines the job opportunity.
The contractor can add comments or request changes in the Add Comment section.
Finally, the contractor clicks Save to submit their response.
VII. Review Contractor Responses and Select Awardees
After contractors respond to the award requests, coordinators can review each contractor’s status and either select an awardee or cancel the request to finalize the contractor selection.
A. Review Contractor Responses
A. Review Contractor Responses
Reopen the client’s quote. This allows the coordinator to access the latest contractor responses and manage the award process efficiently.
Review the Status column for each contractor on the Contractor Recommendations section. This provides a clear view of each contractor’s response to the award request.
If a contractor clicks Express Interest in the award request form they receive, their status changes to For Review. This means the contractor is interested in the job, but they are not automatically awarded the job. The coordinator can then choose to either select the awardee or cancel the request.
B. Select Awardee or Cancel Request
B. Select Awardee or Cancel Request
Under the Actions column, the coordinator can click Select Awardee to assign the job to that contractor. This action designates the contractor as the final awardee.
After selecting the final awardee, the coordinator must set the status of the quote to Accepted.
Then, click Save. Saving finalizes the awarding process, generates a care plan from the Recurring Service section, and creates Once Off Bookings from the Once Off Items section.
4. An email will be sent to the contractor notifying them that they have been selected as the awardee of the award request.
5. The contractor selected as the final awardee upon accepting the quote will be automatically assigned as the Preferred Carer for the Care Plan and as the Assigned Carer for any once-off bookings.
6. Alternatively, the coordinator can click Cancel Request if the contractor should no longer be considered. This allows the coordinator to withdraw award requests when necessary.
7. If a contractor clicks Express Interest - with Changes in the award request form they receive, their status changes to Requested Changes.
8. Under the Actions column, the coordinator can click Send Award Request again, noting the requested changes. This allows the coordinator to address and negotiate any modifications before proceeding.
9. If a contractor is not interested, their status changes to Declined. This immediately informs the coordinator that the contractor is unavailable, so alternative options can be considered.
VIII. Manage the Contractor Jobs Action Board
The Contractor Jobs Action Board provides coordinators a centralized and convenient way to view all contractor award requests across client services. It serves as the main section for monitoring and managing contractor responses in one place.
A. Accessing the Action Board
A. Accessing the Action Board
Click Actions in the left menu to access the actions board.
Click Contractor Jobs.
The system displays all contractor jobs.
Column
Description
Actions
Quick buttons to Award, Decline, Accept, or Cancel the award request.
Job Offer ID
Unique identifier for each contractor job offer or award request.
Service
The specific service associated with the award request.
Contractor Name
Name of the contractor.
Client Name
Name of the client requesting the service.
Quote Reference ID
Reference number for the related quote.
Quote Type
Indicates the type of quote (recurring, once off).
Billing Category
Classification for billing purposes.
Status
Current progress or state of the award request.
Comments
Notes or feedback provided by both contractor and coordinator.
Due Date
Deadline for the contractor to accept the award request.
Created Date
When the award request was initially created.
Created By
Coordinator who created the award request.
Modified Date
Last date the award request was updated.
B. Filtering and Managing Jobs
B. Filtering and Managing Jobs
Click the filter icon at the top right of the Contractor Jobs section to open the filter options.
Refer to the provided table for descriptions of each filter to guide your selection.
Filter Value
Definition
Due Date From
Start date for due date range
Due Date To
End date for due date range
Quoted At From
Start date for quote creation
Quoted At To
End date for quote creation
Awarded At From
Start date for award date range
Awarded At To
End date for award date range
Created At From
Start date for record creation
Created At To
End date for record creation
Status
Shows jobs by their current stage, such as awarded, cancelled, declined, expired, pending, quoted, or unsuccessful.
Service
Type of service offered or quoted
Contractor
Name of contractor
Client
Name of client
Click Clear Filters if you want to remove all applied filters and view the full list again.
Click Apply Filters to display jobs that match your selected criteria.
C. Award Jobs in the Contractor Jobs Action Board
C. Award Jobs in the Contractor Jobs Action Board
Go to the Contractor Jobs section to view all available jobs.
Identify and select the job you want to award to a contractor.
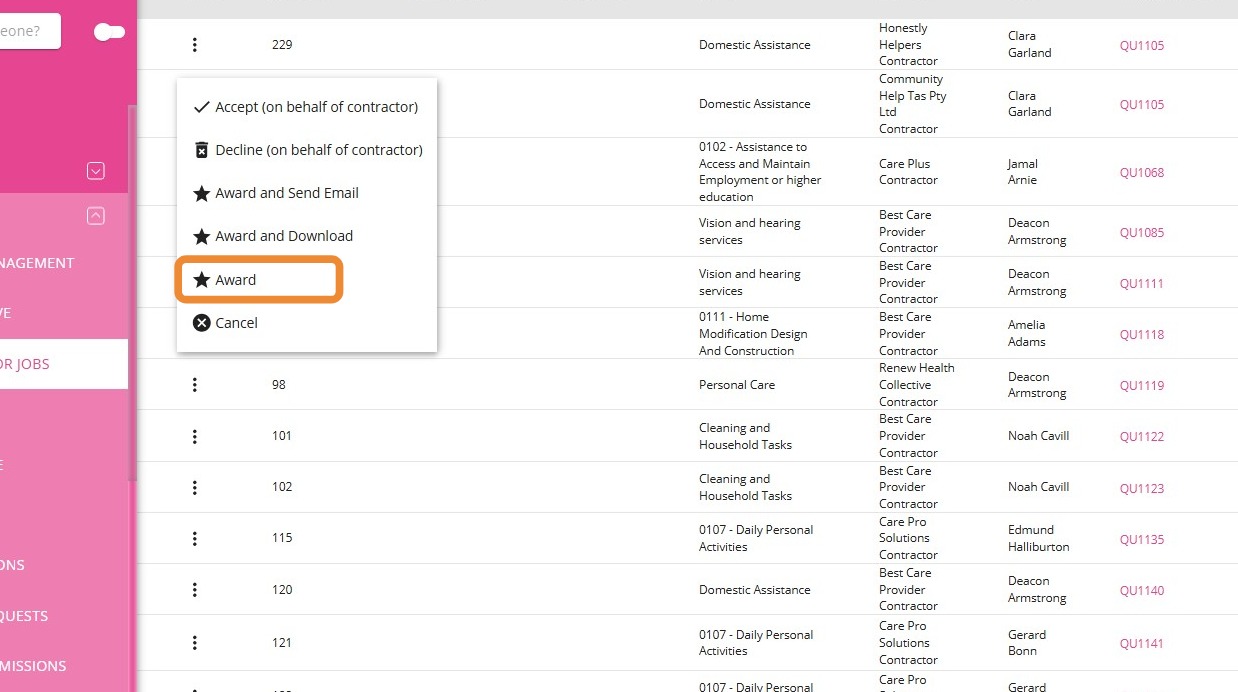
In the Actions column, click the three dots beside the service name.
Choose Award to assign the job to the selected contractor. You can also select other options to update the job status as appropriate.
Option
Definition
Award
Assigns the job to the selected contractor. The contractor selected as the final awardee upon accepting the quote will be automatically assigned as the Preferred Carer for the Care Plan and as the Assigned Carer for any once-off bookings.
Cancel
Cancels the job assignment for the selected contractor and removes them from the award process so another contractor can be considered.
Accept (on behalf of contractor)
Marks the job as Accepted on behalf of the contractor, confirming their acceptance without requiring them to respond through the award request email.
Decline (on behalf of contractor)
Updates the contractor’s response to Declined, indicating they are not available for the job and allowing the coordinator to consider other contractors.
Award and Send Email
Assigns the job to the selected contractor and sends an email notification with a secure link to view the job details and access the Service Agreement.
Award and Download
Assigns the job to the selected contractor and downloads the Service Agreement so it can be saved, printed, or shared manually with the contractor.
Notes:
Once you award the job, the system automatically cancels all other pending offers for that job.
Contractors with cancelled offers receive a retraction notification, informing them that they were not selected for the job.
IX. Steps for Contractors to Download the Service Agreement
When a job is awarded, the system automatically sends an email notification to the contractor. The contractor clicks the View Service Agreement button in the email.
See more
Steps for Contractors to Download the Service Agreement
When a job is awarded, the system automatically sends an email notification to the contractor. The contractor clicks the View Service Agreement button in the email.
The contractor is redirected to a secure page.
The contractor enters the security code provided in the email and clicks Submit to proceed.
After verification, the contractor can download the service agreement for review and signature.
The service agreement provides the details of the engagement, including the client’s details, a description of the services to be delivered, disclaimers, and designated fields for all required signatures. This document ensures that all parties are informed of their responsibilities and the terms governing the service arrangement. Here is a sample Service Agreement:
Once the job is accepted and awarded, the client’s care plan is updated to include the new service. This ensures the selected contractor is officially assigned to deliver the service as part of the client’s care plan.
See more
View Awarded Service on Client Calendar
1. To view the client’s overall schedule, use the left menu bar to navigate to the People section.
Click Clients to display the list of all clients.
Select a specific client.
Open the Calendar for the selected client.
The calendar displays the client’s schedule, including all assigned services.
The awarded service, along with all relevant details, will automatically appear on the client’s schedule for each period the service is assigned. This provides a clear overview of the client’s care plan and ensures accurate scheduling for both the client and contractor.
Where Else to Find Contractor Recommendations?
Contractor Recommendations are accessible in various sections within the CareVision portal, such as Careplans/Scheduled Service, Once-Off Bookings, Client Calendar, Staff Calendar, Service Request, Service Review, and through Quick Action > Adhoc Booking. This way, you can quickly access and use contractor features wherever you manage client services.
Contractor Recommendations in Careplans/Scheduled Service Modal
In the client's profile, go to CarePlans/Scheduled Service > Update Service Schedule.
2. Select the care plan item you want to update.
3. In the Schedule & Rates section, click on the service schedule to expand it.
4. Click on Contractors Recommendations to view and send award requests to your preferred contractors.
Contractor Recommendations in Adhoc Booking Modal
1. In the client's profile, go to Service Orders > Create or Edit Ad-hoc Booking.
2. In the Delivery Details section, you will find Contractor Recommendations located just above the start location of the service.
3. Click on Contractor Recommendations to view and send award requests to your preferred contractors.
Contractor Recommendations in Client Calendar
1. In the client's profile, go to Calendar and click on a booking.
2. In the Delivery Details section, you will find Contractor Recommendations located just above the start location of the service.
3. Click on Contractor Recommendations to view and send award requests to your preferred contractors.
Contractor Recommendations in Service Request Board
1. In the left navigation pane, click Actions > Service Requests > Create or Edit Ad-hoc Booking.
2. In the Delivery Details section, you will find Contractor Recommendations located just above the start location of the service.
3. Click on Contractor Recommendations to view and send award requests to your preferred contractors.
Contractor Recommendations in Service Review Board
1. In the left navigation pane, click Actions > Service Review.
2. Select the "From" and "To" dates, then click the refresh icon to load bookings.
3. Click on a booking to open its details. Make sure that the service selected for the booking has the Available for Contractors box checked in its initial settings.
4. In the Delivery Details section, you will find Contractor Recommendations located just above the start location of the service.
5. Click on Contractor Recommendations to view and send award requests to your preferred contractors.
Contractor Recommendations in Quick Action
1. Click the plus sign in the lower right corner.
2. Click the last icon to create an ad-hoc booking.
3. Make sure that the service selected for the booking has the Available for Contractors box checked in its initial settings.
4. In the Delivery Details section, you will find Contractor Recommendations located just above the start location of the service.
5. Click on Contractor Recommendations to view and send award requests to your preferred contractors.
The Contractor add-on module streamlines the assignment and management of contractor services. By following these steps, you can efficiently configure all necessary settings, from organization setup and contractor profile creation to quoting and job awarding. This makes managing contractor workflows more organized and effective.
For more information and support on managing contractors in your organization, please contact the CareVision Support Team.
CareVision’s Contractor Add-On Module makes it easier for contractors and care organisations to connect, communicate, and deliver high-quality care across a wide range of service arrangements. As a contractor, whether you’re an independent provider, ...
Lead to Onboarding Workflow Organisations regularly receive new client leads and it is important that the proper team is notified at the appropriate stage of the lead nurture and client onboarding process so they can follow up on and complete the ...
When contractors are no longer engaged with the organisation, an end date and termination reason must be recorded to exit them from the system. This topic describes the exit process for contractors in CareVision. Keywords: contractor exit process, ...
Disclaimer: This topic is subject to rapid product changes. While documentation is updated regularly, it may not reflect the most current information at the time of viewing. The Contractor Service Agreement includes several properties that ...
Setting up this section is important for capturing information that will be included in relevant forms, such as Contractor Service Agreements. Keywords: client groups, client profile, living arrangements, client lives alone, client lives with, ...
Request an Article or Guide
We are keen to know what you want to know more about? Let us know on chat or raise a ticket for an article or topic you would like covered in more detail. We have a team of technical writers and learning content creators keen for your suggestions.